Why Import Transactions into QuickBooks Online?
Businesses switch accounting platforms, migrate from spreadsheets, or consolidate records. Some of the top reasons to import data include:
- Moving from desktop accounting software
- Uploading transactions from bank statements
- Bulk importing invoices or bills
- Rebuilding your QuickBooks account
Rather than entering data manually, QBO offers built-in features and integrations that make import transactions into quickbooks online easier — if you follow the right steps.
Table of Contents
Step-by-Step: How to Import Data into QuickBooks Online
Step 1: Prepare Your Data File
Your success starts with your spreadsheet. Whether you use Excel or CSV, your file should have:
- Clean column headers (no special characters or spaces)
- Correct data format (e.g., dates in DD/MM/YYYY)
- No empty rows or merged cells
- Consistent naming (e.g., customer names, items)
Example headers for invoices:
Invoice Numbers, Customer, Date, Amount, Item, Tax.
Step 2: Login to QuickBooks Online
- Go to quickbooks.intuit.com
- Log in to your account
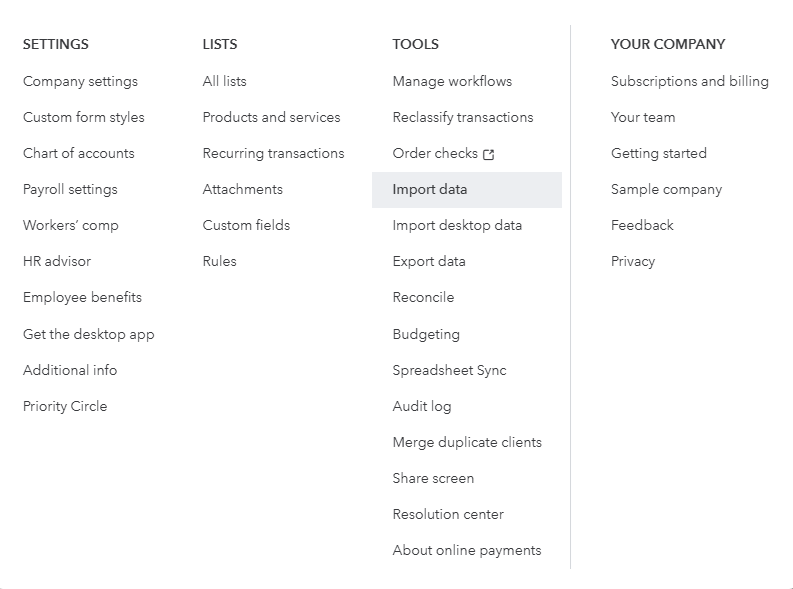
- select Import Data, From the Gear icon in the top-right corner.
Step 3: Choose the Data Type
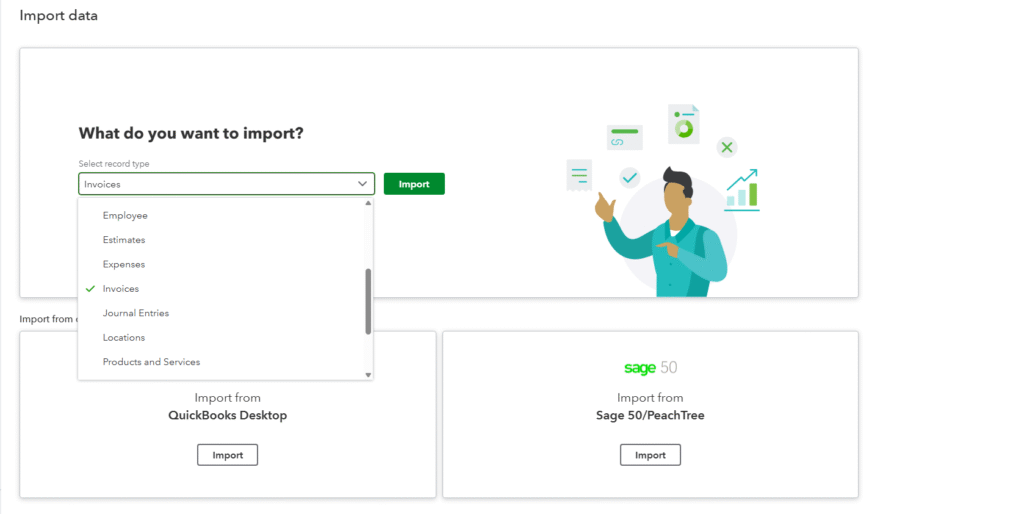
QuickBooks will show a list of data types you can import:
- Customers
- Vendors
- Chart of Accounts
- Products and Services
Choose the appropriate one and continue.
Step 4: Upload Your File

Click “Browse” and select your CSV/XLSX file. Map your fields when file upload is completed.
Step 5: Map Fields Correctly
This step tells QuickBooks which column in your file corresponds to its internal data fields.
Example:
| Your Column | QBO Field |
| “Name” | Customer Name |
| “Email” | Email Address |
| “Amount” | Invoice Total |
If a field doesn’t match, fix your headers and re-upload.
Step 6: Preview and Import transactions in quickbooks
QuickBooks will show a preview of the data. Review it thoroughly:
- Check for missing fields
- Check for duplicate entries
- Confirm date and number formatting
Click “Import” to finalize.
Common Import Errors & How to Fix Them
Even if you follow the steps, errors can occur. Here are the most common ones:
1. Date Format Errors
Cause: Using the wrong date format (e.g., MM/DD/YYYY instead of DD/MM/YYYY)
Fix: Convert all dates to ISO format (YYYY-MM-DD) for consistency.
2. Field Mapping Failures
Cause: Your file has column headers that don’t match QuickBooks expectations
Fix: Edit your file to use standard names or map manually in the import step.
3. Duplicate Entries
Cause: Importing the same data twice
Fix: Always preview and test-import a small batch. Use unique invoice or transaction IDs.
4. Unsupported Characters
Cause: Special symbols (like &, #, %) or emojis
Fix: Use plain text only and remove special characters before uploading.
5. Missing Mandatory Fields
Cause: Missing fields like Customer Name or Amount
Fix: Add required fields to your file. QBO won’t import incomplete data.
How to Undo or Delete a Scrappy Import
QuickBooks does not offer a direct “undo” for imports. However:
If you imported:
Customers or Vendors — You must select and delete them one by one
Transactions (via tools) — Use third party tools to delete them in bulk.
Tip: Always backup your data or test import with a few rows before importing the full file into quickbooks.
Best Practices for Error-Free Importing
Here are our top tips to keep your QuickBooks data clean and accurate:
- Use official templates – Download sample import templates from QuickBooks
- Start with small batches – Test import 5–10 rows first
- Keep naming consistent – Use the same names for customers/items throughout
- Validate before import – Use Excel validation to catch blank cells
Understanding the Limits of QuickBooks Online’s Native Importer
While QuickBooks Online’s native import tool is helpful for small data sets, it has limitations that users should understand before relying on it for large-scale accounting tasks while import data in quickbooks online.
Limitations include:
Transaction Support Is Limited
You can import customers, vendors, chart of accounts, and products/services.
But transactions like invoices, bills, payments, and journal entries are not fully supported unless you use third-party apps.
Non posting transactions like Budgets, Purchase orders and other transactions like payroll, custom fields can not be imported.
No Multi-Line Entry Support
Native import doesn’t support line-item-level imports for transactions.
Invoices and bills which has multiple products or services listed on it can not be imported.
No Rollback Option
Once you import data, QuickBooks doesn’t offer a built-in way to undo or delete the batch.
Mistakes can require time-consuming manual clean-up.
Field Mapping Can Be Rigid
If your file has non-standard column headers, QuickBooks may not recognize them, and mapping becomes tricky.
Solution: Use a more flexible third party import tool which allows importing, exporting, and deleting all types of transactions with line-level detail and better validation.
Final Thoughts
Import data into QuickBooks online can be fast and accurate if you:
- Prepare clean data
- Map fields correctly
- Use automation tools when needed
- Watch for common errors
Whether you’re a small business owner or an accountant handling large datasets, following these steps can save you hours of manual work and prevent costly mistakes.
Frequently Asked Questions (FAQ)
Can I import transactions into QuickBooks Online using a CSV file?
Yes, QuickBooks Online allows you to import bank or credit card transactions using a CSV file. Make sure your CSV is formatted correctly with columns like Date, Description, and Amount.
What is the correct format for a CSV file in QuickBooks Online?
Your CSV file should include:
Date (MM/DD/YYYY or similar)
Description (What the transaction is)
Amount (positive for deposits, negative for expenses)
Also, avoid special characters and ensure no empty rows or extra spaces.
How many transactions can I import at once in QuickBooks Online?
You can import up to 1,000 rows at a time using a CSV file. For larger files, break them into multiple parts or use a third-party tools.
Is there a way to map columns during import?
Yes, QuickBooks lets you manually map your CSV columns to match its fields (Date, Description, Amount) during the upload process.