
When you move to QuickBooks, your customers may already owe you money. Those unpaid amounts need to come into the new file correctly, or your Accounts Receivable, aging reports, and customer statements will be wrong from the start.
To import customer opening balances, you need a clean customer list, the correct balance for each customer, and the right opening balance date. The date matters because it controls when the receivable appears on your reports.
This guide explains how to prepare the file, import the balances into QuickBooks Online, handle QuickBooks Desktop considerations, and verify that Accounts Receivable matches your prior accounting system.
Table of Contents
Quick Answer
To import customer opening balances in QuickBooks Online, go to the Gear icon, choose Import data, select Customers, upload an Excel or CSV file, and map the customer name, opening balance, and opening balance date fields. After the import, run an Accounts Receivable report and compare the total to your prior system.
For the most accurate aging reports, consider importing individual unpaid invoices instead of one summary balance per customer. Summary opening balances are faster, but they do not preserve invoice-level detail.
| Best Option | Use When | Result |
|---|---|---|
| Summary opening balance | You only need total amounts owed by customer | Fast setup, limited aging detail |
| Open invoices | You need accurate due dates, invoice numbers, and aging | Better reports and customer statements |
| Manual entry | You have only a few balances | More control, slower process |
What Is Import Customer Opening Balances?
A customer opening balance is the amount a customer already owes your business as of your QuickBooks start date. For example, if you begin using QuickBooks on January 1 and a customer owes $2,500 from your prior system, that $2,500 is the customer’s opening balance.
Importing customer opening balances means adding those starting receivable amounts in bulk instead of entering each balance manually. Businesses usually do this during a QuickBooks migration, cleanup project, or new company file setup.
The key point is that opening balances affect Accounts Receivable. If the imported total does not match your prior accounting system, your financial reports will not be reliable.
Why It Matters
Customer balances are not just names and numbers. They affect how much money your business expects to collect, how customer statements look, and whether your balance sheet is accurate.
- Time savings: Importing balances is faster than entering dozens or hundreds of customers manually.
- Accuracy: A prepared spreadsheet reduces typing errors and missed customers.
- Compliance: Correct Accounts Receivable supports clean financial statements and tax records.
- Reporting: The opening balance date determines when amounts show on aging and balance sheet reports.
- Productivity: A clean import helps your team start invoicing, receiving payments, and sending statements without cleanup delays.
Requirements Before You Begin
Before importing, confirm that you have the right access and the right data. QuickBooks needs enough information to create customer records and post the starting balances correctly.
| Requirement | Why It Matters |
|---|---|
| QuickBooks user permissions | You need permission to import customer list data and create accounting transactions. |
| Excel or CSV file | QuickBooks Online supports spreadsheet imports for customer data. |
| Unique customer names | Duplicate names can create import errors or duplicate customer records. |
| Opening balance amount | This is the amount each customer owed at the start date. |
| Opening balance date | This controls the accounting date of the receivable. |
| Prior A/R total | You need this number to verify that the import is correct. |
Things to Prepare
Use this checklist before you upload anything. Most import problems happen because the file was not cleaned first.
- CSV or Excel file: Save the customer list in a supported format.
- Backup: If you use QuickBooks Desktop, create a company file backup before importing or pasting list data.
- User permissions: Sign in as a user allowed to import customers and create transactions.
- Customer names: Make sure each customer name is unique.
- Opening balances: Confirm each amount agrees with the prior system.
- Opening balance dates: Use the correct date for each balance.
- Accounts Receivable total: Save a report from the old system for comparison.
- Clean formatting: Remove formulas, blank rows, duplicate rows, merged cells, and unsupported formatting.
Step-by-Step Guide
Step 1: Decide Between Summary Balances and Open Invoices
Before you import, decide how much detail you need. A summary opening balance gives you one amount per customer. It is quick, but it does not show which invoices make up the balance.
If you need accurate aging by invoice date, due dates, invoice numbers, or customer statement detail, recreate the unpaid invoices instead. This takes longer but usually produces better Accounts Receivable reports.
Expected result: You should know whether your file will contain one opening balance per customer or individual open invoices.
Step 2: Export Balances From Your Prior System
Run an Accounts Receivable aging report or customer balance report from your old system as of your QuickBooks start date. This report becomes your control total.
Export the customer names and balances to Excel or CSV if possible. If the old system cannot export, enter the data into a spreadsheet carefully and have someone review it.
Common mistake: Using today’s balance instead of the balance as of the QuickBooks start date. That can duplicate newer invoices or miss old receivables.
Step 3: Clean the Spreadsheet
QuickBooks imports work best when the spreadsheet is simple. Use separate columns for customer name, opening balance, and opening balance date. Remove blank rows, subtotal lines, notes, formulas, and merged cells.
Make sure credit balances are entered correctly. If a customer overpaid and has a credit, confirm how you want that credit handled before importing.
Expected result: Your spreadsheet should contain one clean row per customer balance, with no duplicates or unsupported formatting.
Step 4: Confirm the Total Opening Balance
Add the opening balance column in your spreadsheet and compare it to the Accounts Receivable total from your prior accounting system. This step is not optional. It tells you whether the import file is complete before QuickBooks ever sees it.
If the totals do not match, find the difference before continuing. Look for missing customers, duplicate customers, unapplied credits, or balances dated outside the conversion period.
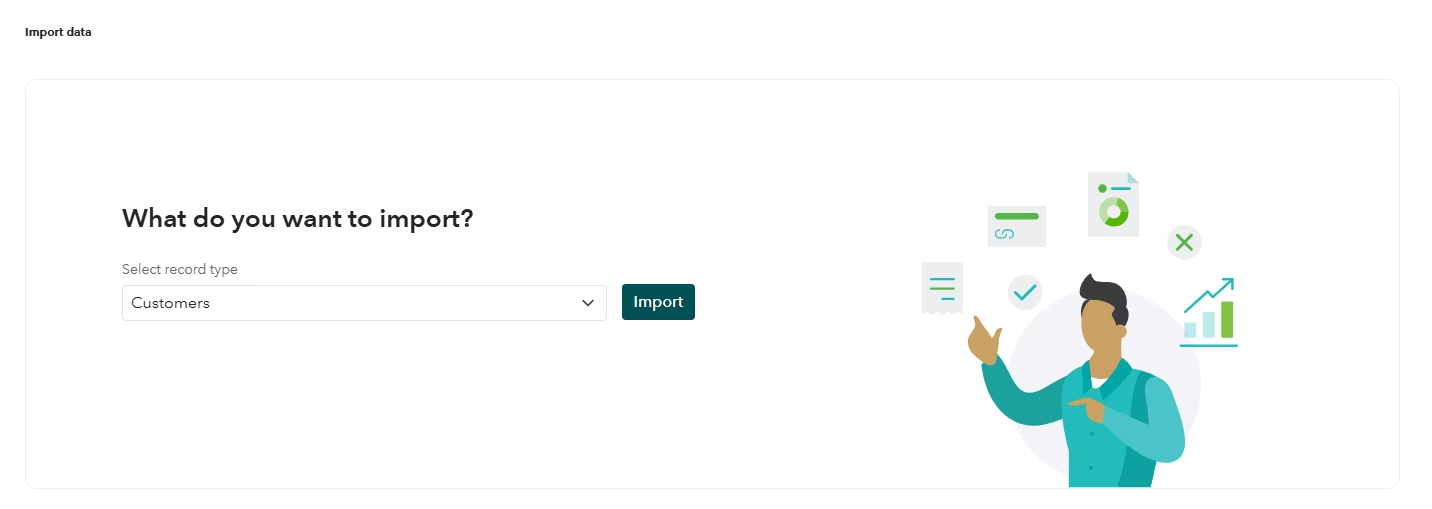
Step 5: Open the Customer Import Tool in QuickBooks Online
In QuickBooks Online, select the Gear icon, then choose Import data. Select Customers from the available import options.
This is where QuickBooks lets you upload your spreadsheet and match your columns to QuickBooks fields.
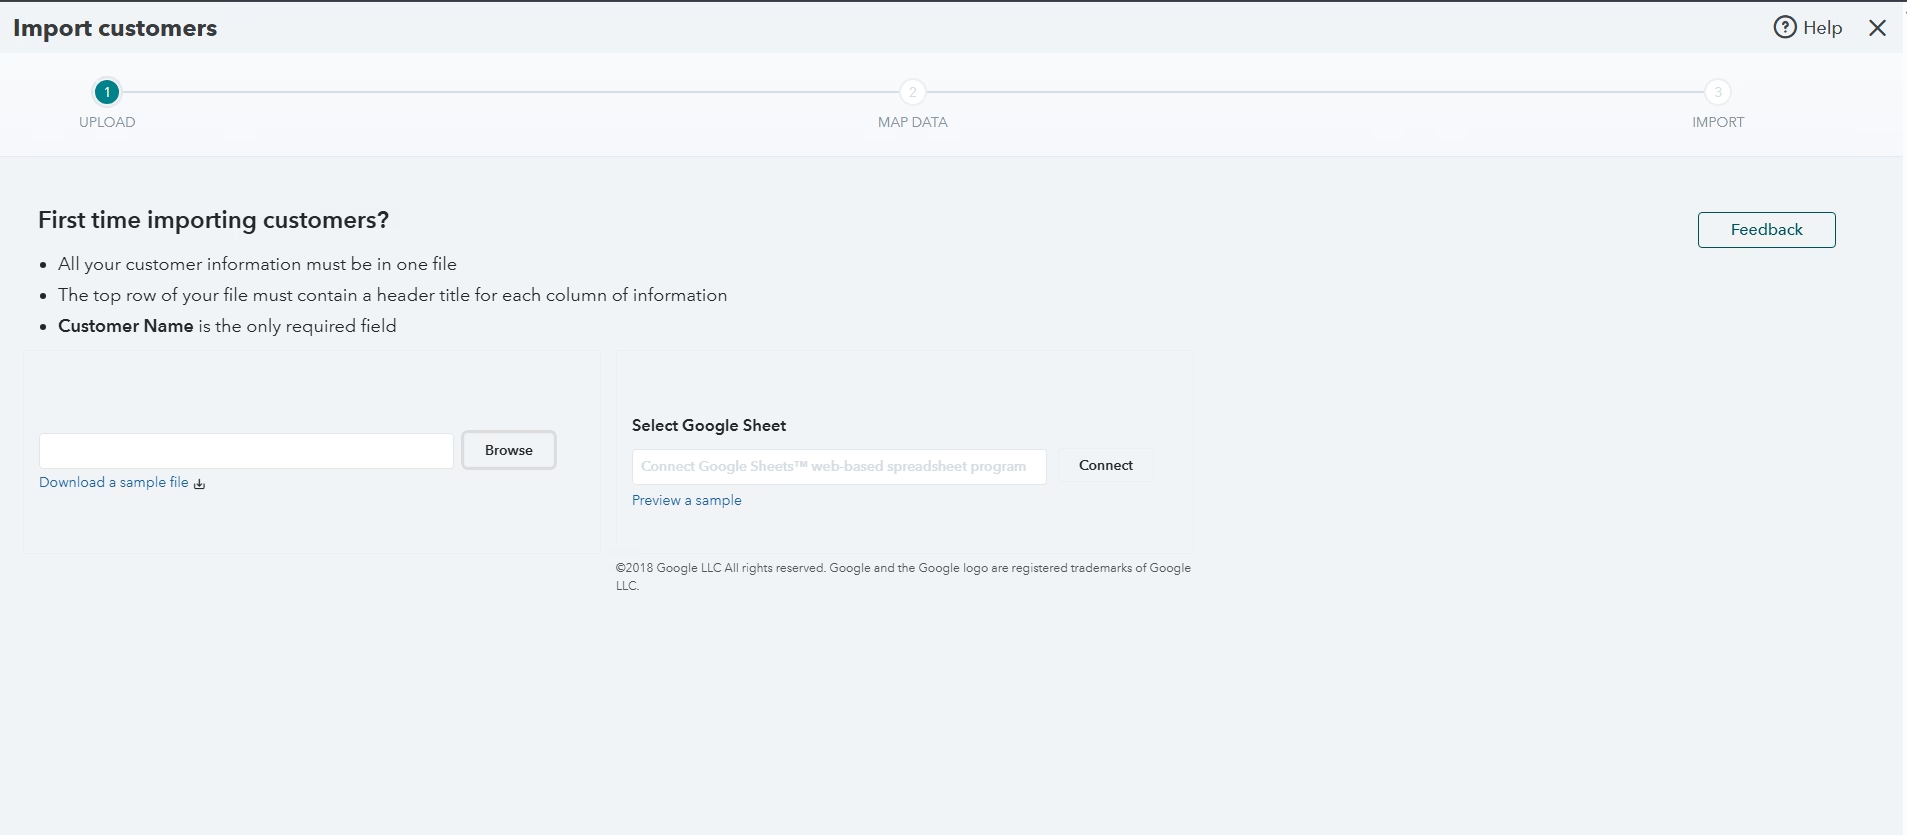
Step 6: Upload the Spreadsheet
Choose your Excel or CSV file and upload it. If QuickBooks gives you an error at this stage, check the file format, remove special formatting, and save a fresh copy.
Expected result: QuickBooks should display a mapping screen where you can connect each spreadsheet column to the correct QuickBooks field.
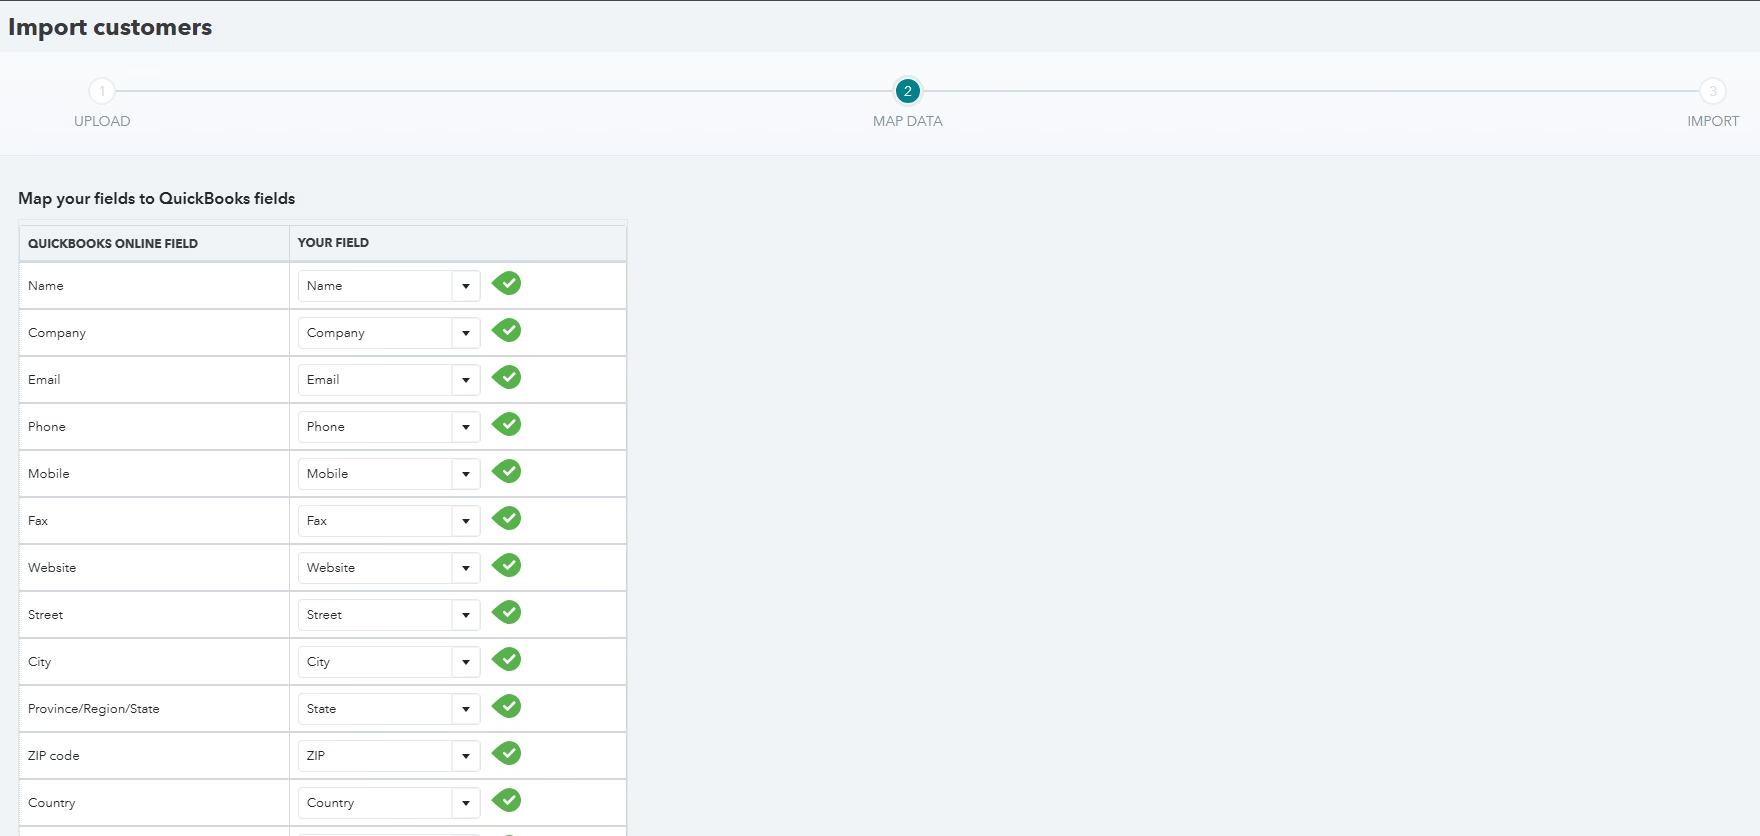
Step 7: Map the Customer Fields
Map the customer name column to the QuickBooks customer name field. Then map the opening balance amount and opening balance date fields if available in the import screen.
Be careful with the date column. The opening balance date controls when the receivable appears in financial reports. If all balances are part of your conversion, many businesses use the day before the first active QuickBooks transaction date.
Step 8: Review the Import Preview
QuickBooks will show a preview before the final import. Review every row that has a warning or error. Fix duplicate names, missing required fields, invalid dates, and incorrectly formatted balances.
Do not rush this screen. It is easier to fix the spreadsheet before import than to clean up incorrect customer balances afterward.
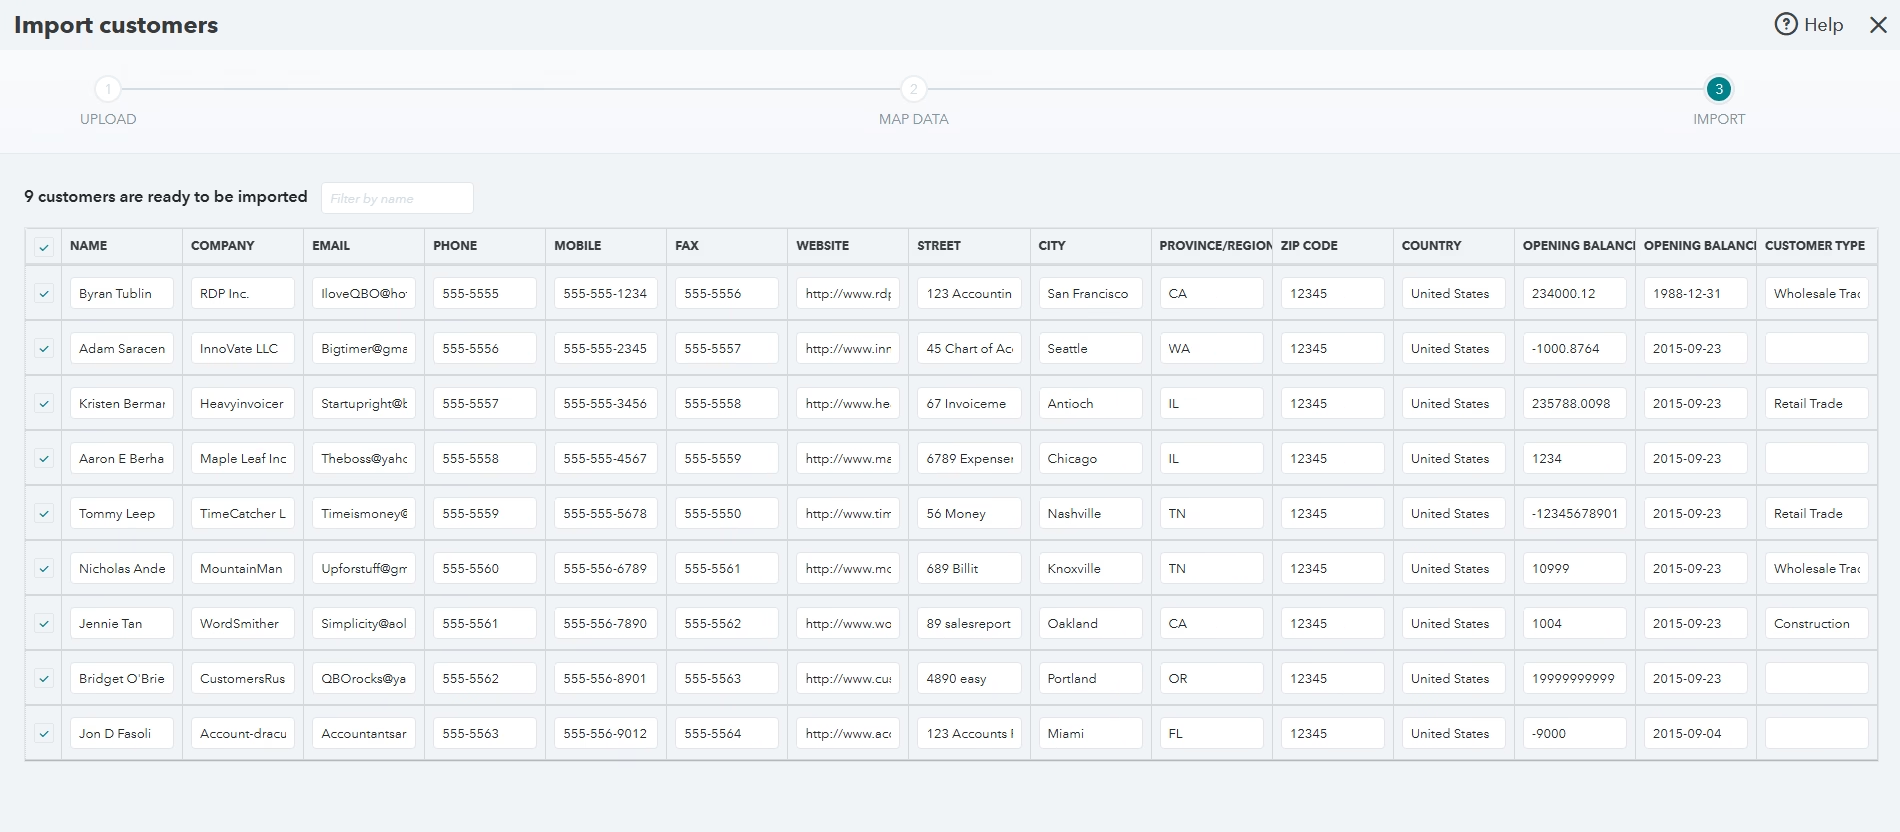
Step 9: Complete the Import
Select the customers you want to import and complete the process. QuickBooks should create customer records and apply the opening balances using the mapped data.
Expected result: Your customers appear in the customer list, and their starting balances appear in Accounts Receivable as of the opening balance date.
Step 10: Review Opening Balance Equity
When QuickBooks creates opening balances, it may post offsetting entries to Opening Balance Equity. That account is commonly used during setup, but it should be reviewed after the migration.
Your accountant may need to reclassify or close out Opening Balance Equity as part of the final conversion entries. Do not ignore it just because Accounts Receivable looks correct.
Step 11: QuickBooks Desktop Considerations
QuickBooks Desktop users should create a backup before importing or pasting list data. Desktop workflows vary depending on the edition and import method, so never test a customer balance import in your live file without a restorable backup.
If you are working with a large Desktop migration, it is usually safer to test in a copy of the company file first, review Accounts Receivable, and then repeat the approved process in the live file.
Verification Checklist
| Check | How to Verify | Expected Result |
|---|---|---|
| Total Accounts Receivable | Run an A/R report as of the opening balance date | Total matches the prior system |
| Customer balances | Compare key customer balances to the old report | Each balance agrees |
| Opening balance dates | Review transaction dates or customer details | Balances appear in the correct period |
| Duplicate customers | Scan the customer list | No accidental duplicate names |
| Opening Balance Equity | Review the account register or report | Offset entries are identified for cleanup |
Common Problems
| Problem | Cause | Solution |
|---|---|---|
| Import file is rejected | Unsupported format or formatting issues | Save as a clean CSV or Excel file and remove formulas |
| Duplicate customers appear | Names were not standardized before import | Merge or clean duplicates carefully after review |
| A/R total is wrong | Missing balances, duplicate rows, or wrong date | Compare the spreadsheet total to the old report |
| Aging report lacks detail | Balances were imported as summaries | Use open invoices if invoice-level aging is required |
| Balances appear in the wrong period | Incorrect opening balance date | Correct the date or reverse and re-enter the balance properly |
Common Mistakes
The biggest mistake is importing summary balances when the business actually needs invoice-level aging. If collections depend on invoice dates, due dates, or detailed statements, summary balances will frustrate your team later.
Another common issue is failing to reconcile the import file before uploading. Always compare the spreadsheet total to the prior Accounts Receivable report first. If the source file is wrong, QuickBooks will faithfully import the wrong numbers.
Also watch for customers with similar names. A small spelling difference can create duplicate records, which makes reporting and payment posting harder.
Best Practices
- Use a conversion date: Pick a clear start date so you know what belongs in opening balances and what belongs in new QuickBooks activity.
- Keep the old A/R report: Save it as support for your beginning balance.
- Import open invoices when detail matters: This gives better aging and statement accuracy.
- Test large imports first: A small test batch helps you catch mapping and formatting issues early.
- Review Opening Balance Equity: It should be part of your final setup cleanup, not a mystery balance left forever.
Frequently Asked Questions
Can I import customer opening balances into QuickBooks Online?
Yes. QuickBooks Online can import customer list data from supported spreadsheet files, including customer names and opening balance fields when mapped correctly.
Should I import one balance per customer or unpaid invoices?
Use one balance per customer if you only need the total owed. Use unpaid invoices if you need accurate aging, due dates, invoice numbers, and customer statement detail.
What date should I use for opening balances?
Use the date the receivable should begin appearing in QuickBooks reports. Many businesses use the day before their QuickBooks start date, but your accountant may recommend a specific conversion date.
Will opening balances affect Accounts Receivable?
Yes. Customer opening balances increase or decrease Accounts Receivable, so the total should match your prior accounting system before you start using QuickBooks actively.
Why is my A/R aging report not detailed after import?
Summary opening balances do not contain invoice-level details. If you need detailed aging, recreate the unpaid invoices instead of importing only one customer balance.
Can I undo a customer balance import?
QuickBooks does not treat every import like a simple undo button. If an import is wrong, you may need to edit, delete, or reverse the affected records. For large imports, get help before making changes.
What happens to Opening Balance Equity?
QuickBooks may use Opening Balance Equity as the offset account for beginning balances. It should be reviewed and cleaned up as part of the final setup process.
Do I need a backup before importing into QuickBooks Desktop?
Yes. Always create a QuickBooks Desktop backup before importing or pasting data. A backup gives you a safe restore point if the import does not work as expected.
Can I import negative customer balances?
Negative balances may represent customer credits or overpayments. Review these carefully before import so they are handled correctly in Accounts Receivable.
Key Takeaways
- Customer opening balances are amounts customers already owe as of your QuickBooks start date.
- Always clean and total your spreadsheet before importing.
- The opening balance date controls when the receivable appears in reports.
- Summary balances are faster, but open invoices provide better aging detail.
- After importing, verify Accounts Receivable against your prior system.
- Review Opening Balance Equity as part of the final cleanup.
Conclusion
Importing customer opening balances is one of the most important steps in a QuickBooks setup or migration. When it is done correctly, your Accounts Receivable starts clean, your customer balances make sense, and your team can begin collecting payments with confidence.
The safest approach is to prepare the spreadsheet carefully, decide whether summary balances or open invoices are better for your reporting needs, and verify the final A/R total immediately after import.
Need Expert Help with QuickBooks?
Databrax can help you import customer opening balances, migrate data, perform bulk imports, clean up Accounts Receivable, resolve QuickBooks errors, build accurate reports, and provide ongoing QuickBooks support. If you want the import done correctly the first time, our QuickBooks specialists can review your file, prepare the data, and verify the results.