
Introduction
Duplicate vendors in QuickBooks Online can make your books messy fast. You may see the same supplier listed as “ABC Supply,” “A.B.C. Supply,” and “ABC Supply Inc.”, with bills, expenses, credits, and payments split across separate records.
When you merge duplicate vendors in QuickBooks Online, QuickBooks combines two vendor profiles into one remaining vendor record. The transactions from the duplicate vendor move to the vendor you keep, so your reports, vendor balance, and accounts payable details are easier to review.
The important part is doing it carefully. Vendor merges are permanent in QuickBooks Online, and the vendor record you edit is the one that disappears. This guide walks you through the safest way to merge vendors, what to check first, and how to verify the results afterward.
Table of Contents
Quick Answer
To merge duplicate vendors in QuickBooks Online, go to Expenses, then Vendors. Open the vendor you do not want to keep, select Edit, and change the Display name as field to match the exact display name of the vendor you want to keep. Select Save, then confirm the merge when QuickBooks asks.
After the merge, QuickBooks Online moves the duplicate vendor’s bills, expenses, checks, vendor credits, payments, and history to the remaining vendor record. The duplicate vendor profile is removed from the active vendor list.
| Item | Quick Answer |
|---|---|
| Can you undo it? | No. A vendor merge is permanent in QuickBooks Online. |
| Which vendor disappears? | The vendor record you edit and rename disappears. |
| What field triggers the merge? | The Display name as field must match exactly. |
| What happens to transactions? | They move to the vendor record that remains. |
What Is Merging Duplicate Vendors in QuickBooks Online?
Merging vendors is a QuickBooks Online list cleanup action that combines two vendor records into one. A vendor is any person or business you pay for products or services, such as a subcontractor, utility company, supplier, landlord, or professional service provider.
Businesses use vendor merging when the same payee was accidentally entered more than once. This often happens during bank feed categorization, bill entry, imports, migrations, or when multiple users create vendors without checking the existing vendor list first.
The merge matters because QuickBooks reports by vendor name. If one vendor has transactions under two names, your Expenses by Vendor Summary, Transaction List by Vendor, 1099 review, and open bill reports may not show the full picture in one place.
Why It Matters
Cleaning up duplicate vendors saves time because you no longer have to check multiple profiles for the same supplier. Your team can enter bills, code expenses, and review vendor balances faster.
It also improves accuracy. When transactions are split across duplicate records, vendor balances can look incomplete, old credits may be missed, and open bills may be paid from the wrong profile.
For compliance, vendor cleanup is especially important for 1099 vendors. If payments are split between duplicate vendor records, your year-end 1099 review may be inaccurate unless the records are combined or reviewed carefully.
Better vendor data also improves reporting and productivity. Your accountant, bookkeeper, or office manager can trust vendor reports instead of exporting them to Excel and manually combining names.
Requirements Before You Begin
Before you merge duplicate vendors in QuickBooks Online, slow down and confirm that both records truly represent the same real-world payee. Similar names are not enough. Two vendors may share a brand name but have different legal entities, tax IDs, locations, or payment instructions.
| Requirement | Why It Matters |
|---|---|
| User permission | You need access to manage vendors and expenses. |
| Correct vendor to keep | The vendor you edit is removed after the merge. |
| Matching vendor type | QuickBooks Online merges vendor records with vendor records, not customers or employees. |
| Same currency | If multicurrency is enabled, vendors generally must use the same currency. |
| Profile review | Contact details, tax ID, terms, email, and 1099 settings should be checked before merging. |
Things to Prepare
Use this checklist before making the change. It gives you a simple audit trail and reduces the chance of merging the wrong record.
- Vendor list export: Export or print your vendor list before cleanup.
- Transaction review: Open both vendor transaction lists and scan bills, checks, credits, and payments.
- User permissions: Confirm your QuickBooks Online user can edit vendor records.
- 1099 details: Review tax ID, address, email, and 1099 tracking for reportable vendors.
- Payment terms: Decide which terms, email, and mailing address should remain.
- Open bills: Check accounts payable activity before merging during a payment run.
- Inactive names: Show inactive vendors so hidden duplicates are not missed.
Step-by-Step Guide
Step 1: Decide which vendor record should remain
Start by choosing the vendor profile you want to keep. In most cases, keep the record with the best profile data: correct legal name, tax ID, email address, payment terms, mailing address, and 1099 setup.
If one record has better profile information and the other has more transactions, update the record you plan to keep before merging. QuickBooks Online does not give you a conflict-resolution screen where you can pick field-by-field details during the merge.
Expected result: You know which vendor will remain and which duplicate vendor will disappear.
Step 2: Review both vendor profiles
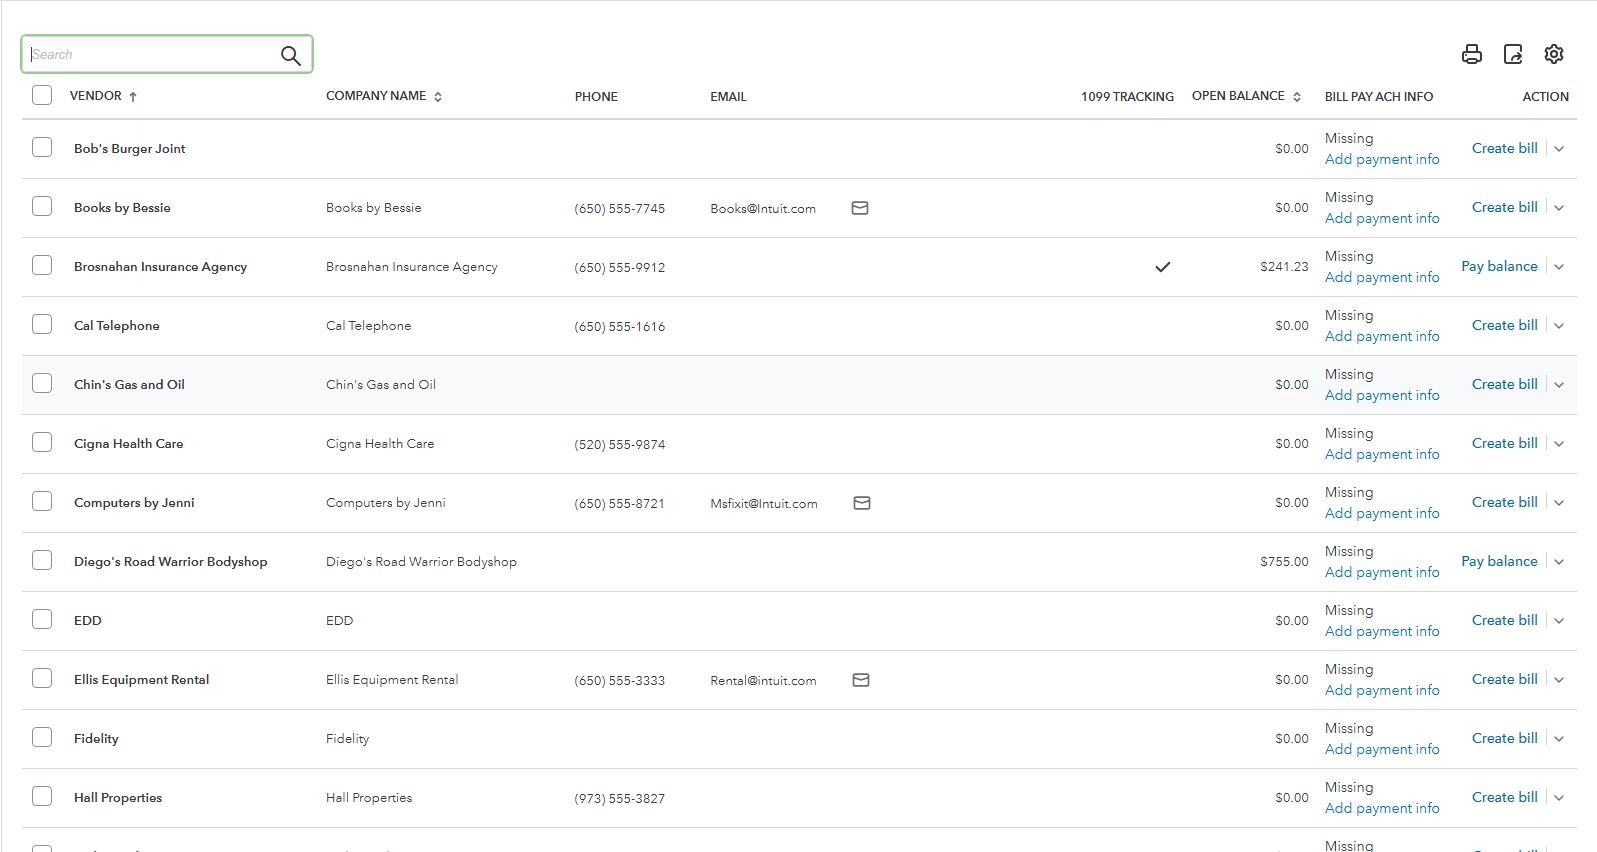
Go to Expenses, then Vendors. Open each vendor profile and compare the display name, company name, email, phone number, billing address, tax ID, payment terms, and 1099 tracking.
This step matters because the display name is not always the vendor’s legal business name. A vendor may operate under a DBA, while the legal name and tax ID belong to a different entity.
Step 3: Open the duplicate vendor you do not want to keep
From the vendor list, open the vendor record that should disappear after the merge. This is the most common place users make a costly mistake. Do not open and edit the vendor you want to keep.
For example, if you want to keep “ABC Supply Inc.” and remove “A.B.C. Supply,” open “A.B.C. Supply.” That is the record you will rename.
Expected result: You are viewing the duplicate vendor record, not the final vendor record.
Step 4: Select Edit
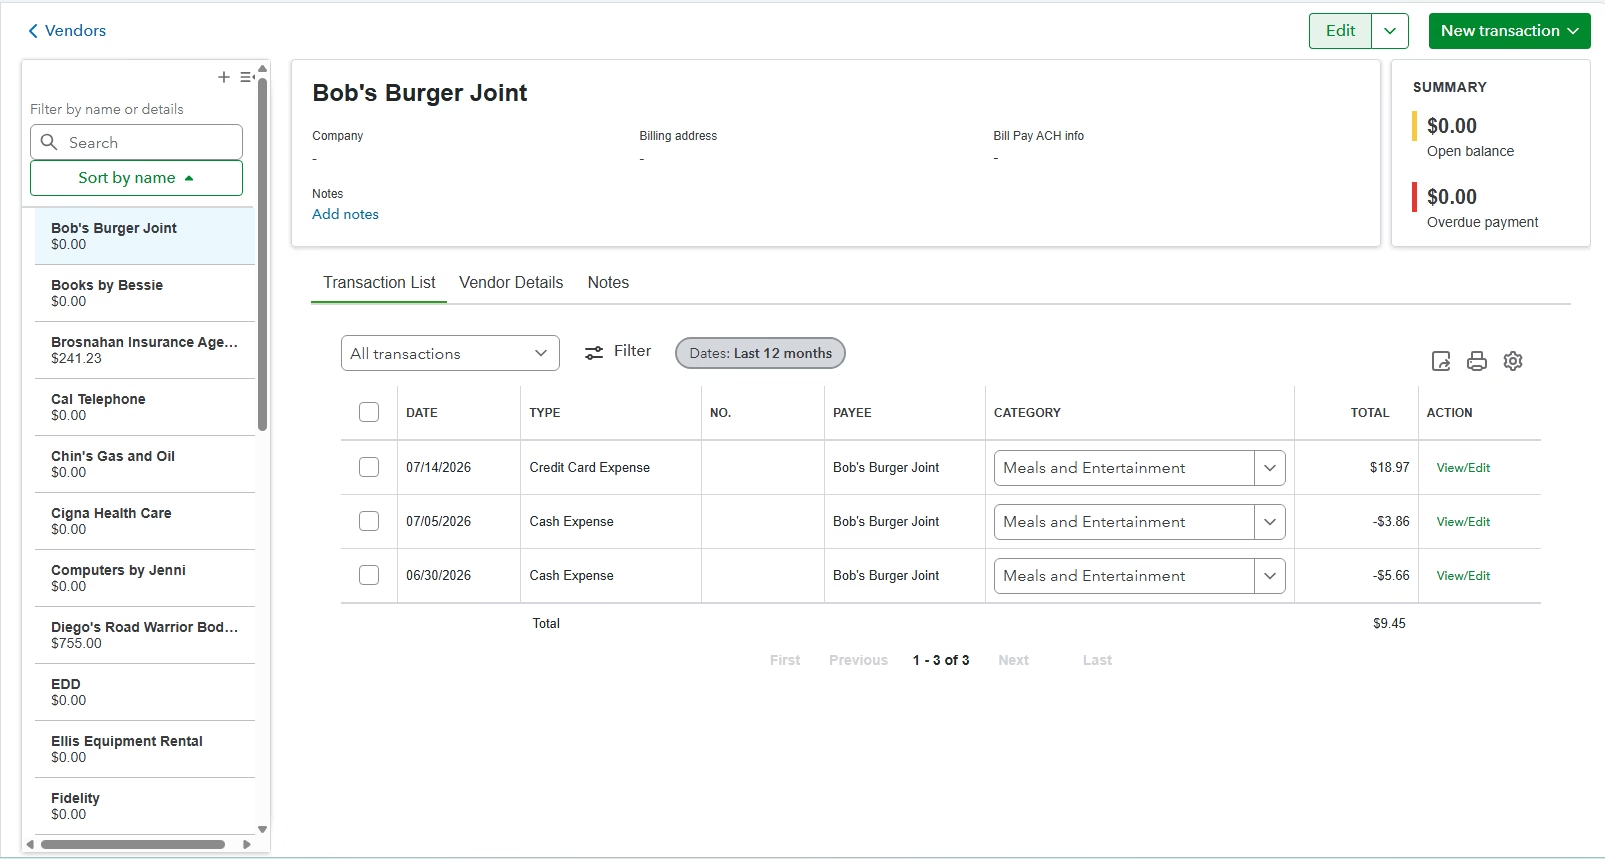
Inside the duplicate vendor profile, select Edit. This opens the vendor information window where you can change the display name and other profile fields.
Before changing anything, take one final look at the vendor name at the top of the screen. If you are on the wrong vendor, cancel out and return to the vendor list.
Step 5: Change the Display name as field
In the Display name as field, enter the exact display name of the vendor you want to keep. The spelling, spacing, punctuation, and suffix must match. A small difference may prevent QuickBooks Online from showing the merge prompt.
Do not use the company name field or print-on-check name to trigger the merge. In QuickBooks Online, the merge is triggered by the Display name as field.
Expected result: The duplicate vendor now has the same display name as the existing vendor you want to keep.
Step 6: Select Save and confirm the merge
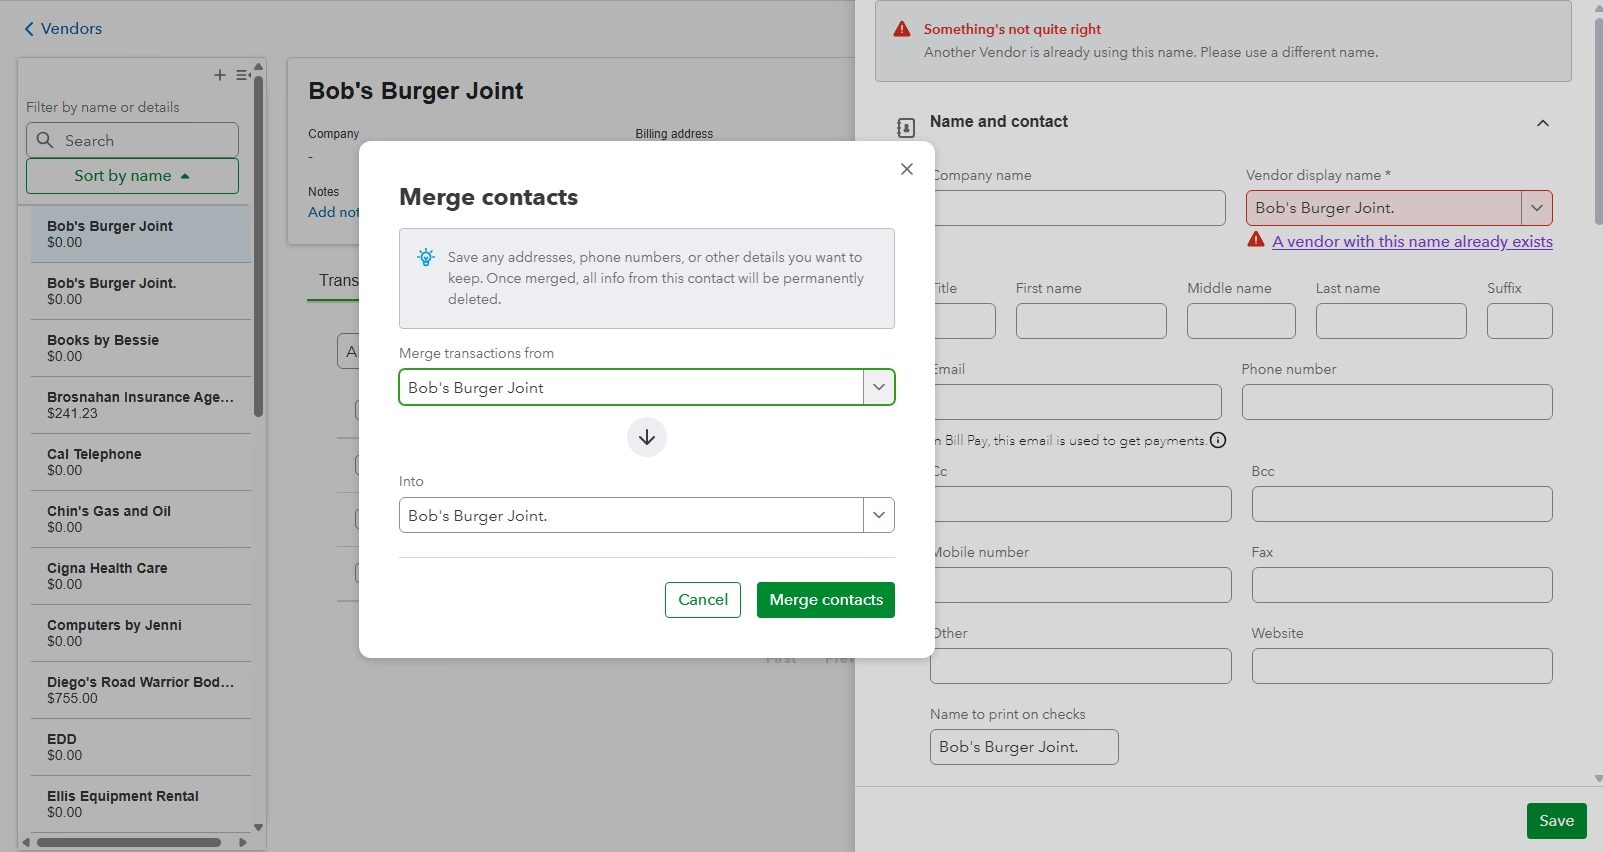
Select Save. QuickBooks Online should detect that another vendor already uses that display name and ask you to confirm the merge.
Read the confirmation carefully. If QuickBooks asks whether you want to merge the vendors, select Yes only if you are certain both records are the same payee. Once confirmed, the merge cannot be undone from within QuickBooks Online.
Step 7: Review the remaining vendor record
After the merge, return to the vendor list and open the vendor that remains. Review the transaction list to confirm that activity from both previous vendor records now appears together.
Check open bills, vendor credits, bill payments, checks, and expenses. If the vendor had unpaid bills, review your Accounts Payable Aging report to make sure the balance still looks correct.
Expected result: Only one vendor record remains, and all related vendor history appears under that record.
Verification Checklist
| Check | How to Verify | Expected Result |
|---|---|---|
| One vendor remains | Search the vendor list for both old names. | Only the vendor you kept appears as active. |
| Transactions moved | Open the remaining vendor’s transaction list. | Bills, expenses, checks, credits, and payments appear together. |
| Vendor balance | Compare the balance before and after the merge. | The remaining vendor reflects combined activity. |
| Open payables | Run Accounts Payable Aging. | Unpaid bills appear under the remaining vendor. |
| 1099 setup | Review tax ID, address, email, and 1099 tracking. | The vendor is ready for accurate 1099 review. |
| Reports | Run Expenses by Vendor Summary or Transaction List by Vendor. | Historical activity is combined under one vendor. |
Common Problems
| Problem | Cause | Solution |
|---|---|---|
| Merge prompt does not appear | The display names do not match exactly. | Copy the exact display name from the vendor you want to keep and paste it into the duplicate record. |
| Wrong vendor disappeared | The user edited the vendor that should have remained. | Review the Audit log and remaining vendor data. You may need professional cleanup because the merge cannot be reversed. |
| QuickBooks blocks the merge | Vendors may use different currencies or restrictions. | Confirm both are vendor records and, if multicurrency is enabled, check the assigned currencies. |
| Duplicate still appears | The duplicate may be inactive or spelled differently. | Show inactive vendors and search for abbreviations, punctuation, and alternate spellings. |
| Reports look different | Older transactions from the duplicate vendor are now included. | Run transaction detail reports by date to understand the combined history. |
Common Mistakes
The biggest mistake is editing the vendor you want to keep. Remember: the vendor record you rename is the one QuickBooks removes from the active vendor list after the merge.
Another common mistake is assuming a merge can be reversed later. It cannot. If you merge two different tax entities, you may create reporting and 1099 problems that require careful manual cleanup.
Users also confuse display name, company name, and print-on-check name. For QuickBooks Online vendor merges, the Display name as field is the field that matters.
Finally, avoid merging vendors just to hide old activity. If the vendor is old but legitimate, making the vendor inactive is often safer than merging it into another record.
Best Practices
- Keep the cleanest profile: Choose the vendor record with the most accurate tax, address, contact, and payment details.
- Review transactions first: Confirm both vendor records contain activity for the same payee.
- Clean up during a quiet period: Avoid vendor merges while your team is actively entering bills or processing payments.
- Standardize vendor names: Use a consistent naming rule, such as legal name first and DBA in the company name or notes when needed.
- Use inactive status when appropriate: If two vendors are different legal entities, do not merge them.
- Document cleanup: Export the vendor list before changes and review the Audit log afterward.
Frequently Asked Questions
Can I undo a vendor merge in QuickBooks Online?
No. QuickBooks Online does not provide an undo option for vendor merges. You should export or print key vendor details and transaction lists before merging.
Will I lose transactions when I merge vendors?
No, QuickBooks Online moves the duplicate vendor’s transactions to the vendor record that remains. You should still verify bills, expenses, credits, and payments afterward.
Which vendor record should I edit?
Edit the duplicate vendor you do not want to keep. The vendor you rename is the one that disappears after the merge.
Why is QuickBooks not asking me to merge the vendors?
The display names probably do not match exactly. Check spelling, punctuation, spaces, abbreviations, and suffixes such as Inc., LLC, or Co.
Can I merge a vendor with a customer?
No. QuickBooks Online does not merge vendor records directly with customer or employee records. Both records must be vendors.
Can I merge inactive vendors?
You can find inactive duplicates by showing inactive names in the vendor list. Review them carefully before deciding whether a merge is appropriate.
What happens to open bills after a vendor merge?
Open bills move to the remaining vendor record. After the merge, check Accounts Payable Aging and the vendor transaction list to confirm the balance is correct.
Does merging vendors affect 1099 reporting?
Yes, it can. Payments from both records will be associated with the remaining vendor, so verify tax ID, address, email, and 1099 tracking settings after the merge.
Can I bulk merge vendors in QuickBooks Online?
QuickBooks Online does not offer a standard bulk vendor merge workflow. Handle merges one at a time and verify each result before continuing.
Key Takeaways
- To merge duplicate vendors in QuickBooks Online, rename the duplicate vendor’s Display name as field to match the vendor you want to keep.
- The vendor record you edit is the one that disappears after the merge.
- Vendor merges are permanent and cannot be undone in QuickBooks Online.
- Transactions move to the remaining vendor, including bills, expenses, checks, credits, and payments.
- Always review 1099 settings, open bills, vendor balances, and reports after merging.
Conclusion
Merging duplicate vendors is one of the fastest ways to clean up vendor reports and make QuickBooks Online easier to manage. When done correctly, it combines scattered vendor activity into one accurate record without losing transaction history.
The key is preparation. Decide which vendor should remain, verify that both records belong to the same payee, review 1099 and payment details, and confirm the results with reports after the merge.
If you are working through a large vendor cleanup, migration cleanup, or year-end 1099 review, take your time. A careful merge saves hours later and helps keep your books reliable.
Need Expert Help with QuickBooks?
Need help cleaning up duplicate vendors, fixing messy QuickBooks data, or reviewing your accounts payable records? Databrax can help with QuickBooks data migration, bulk imports, cleanup, error resolution, reporting, and ongoing support so your books are accurate and easier to manage.