
Table of Contents
Introduction
If you have dozens, hundreds, or thousands of paid sales sitting in a spreadsheet, manually entering each one into QuickBooks Online can waste hours and create mistakes. The faster approach is to import sales receipts into QuickBooks Online using a properly prepared file and a reliable import method.
A sales receipt records a sale that was paid at the time of purchase. That makes accuracy especially important because the transaction affects income, sales tax, customer history, deposited funds, and financial reports immediately.
In this guide, I’ll walk you through what QuickBooks can and can’t do natively, how to prepare your data, how to map your import fields, and how to verify the results before they create cleanup problems.
Quick Answer
To import sales receipts into QuickBooks Online, prepare a CSV or Excel file with clean transaction data, confirm that customers, products, services, tax settings, and deposit accounts already exist, then use a trusted third-party importer or QuickBooks Online API-based tool to upload and map the fields.
QuickBooks Online does not provide the same simple built-in CSV importer for sales receipts that it provides for some lists and selected transaction types. In most cases, businesses use an import app from the QuickBooks App Store, a migration tool, or a professional data import service.
| Import Item | Best Method | Important Note |
|---|---|---|
| Small number of receipts | Manual entry | Best when accuracy matters more than speed |
| Large CSV or Excel file | Third-party import app | Requires careful field mapping |
| Complex ecommerce or POS data | Professional migration or API import | Best for taxes, fees, discounts, and deposits |
| Ongoing sales sync | Integrated POS or ecommerce connector | Prevents repeat manual imports |
What Is How to Import Sales Receipts into QuickBooks Online?
Importing sales receipts means bringing paid sales transactions from an outside file or system into QuickBooks Online. These records may come from a point-of-sale system, ecommerce platform, payment processor, CRM, spreadsheet, or another accounting program.
A sales receipt is different from an invoice. Use a sales receipt when the customer paid immediately. Use an invoice when the customer will pay later. Mixing these up is one of the fastest ways to create incorrect accounts receivable and income reports.
Businesses usually import sales receipts during a software migration, historical data catch-up, ecommerce reconciliation, POS cleanup, or after operating outside QuickBooks for a period of time.
Why It Matters
A clean sales receipt import saves time, but speed is only part of the value. When the import is done correctly, QuickBooks can show accurate revenue, customer sales history, product income, sales tax liability, and deposit activity.
- Time savings: Bulk importing avoids entering every paid sale one at a time.
- Accuracy: A structured file reduces typing errors and missing details.
- Compliance: Correct tax codes and dates support sales tax reporting.
- Reporting: Products, classes, locations, and customers make reports more useful.
- Productivity: Your team can focus on review instead of repetitive entry.
The biggest risk is importing bad data quickly. A messy import can duplicate income, post payments to the wrong account, or create sales tax balances that do not match your filings.
Requirements Before You Begin
Before importing, make sure QuickBooks Online is ready to receive the transactions. Most failed imports happen because the file contains names, items, accounts, or tax codes that QuickBooks cannot match.
| Requirement | Why It Matters | What to Check |
|---|---|---|
| Admin access | Import tools need permission to create transactions | Use a company admin or primary admin login |
| Clean CSV or Excel file | Bad formatting causes rejected rows | One row per line item or use the format required by your importer |
| Customers | Receipts must connect to customer names | Create or import customers first |
| Products and services | Line items post income correctly | Match item names exactly |
| Sales tax setup | Tax reporting depends on correct codes | Confirm agencies, rates, and taxable items |
| Deposit account | Payments need somewhere to post | Use Undeposited Funds or the correct bank account |
Things to Prepare
Use this checklist before you upload anything. A few minutes of preparation can prevent hours of cleanup.
- CSV or Excel file with clean column headers
- Exported reports or backup option if available in your QuickBooks plan
- Company admin permissions
- Customer list reviewed for duplicates
- Products and services created in QuickBooks
- Chart of Accounts reviewed, especially income and deposit accounts
- Sales tax settings confirmed
- Classes and locations created if you use them
- Payment methods such as cash, check, credit card, or online payment
- A small test batch of 3 to 5 receipts
Step-by-Step Guide
Step 1: Confirm that sales receipts are the correct transaction type
Start by confirming that each transaction was paid at the time of sale. This matters because a sales receipt records both the sale and the payment in one transaction.
If the customer still owes you money, do not import that record as a sales receipt. It should be imported or entered as an invoice instead. After this step, your import file should contain only paid sales.
Step 2: Review your source file
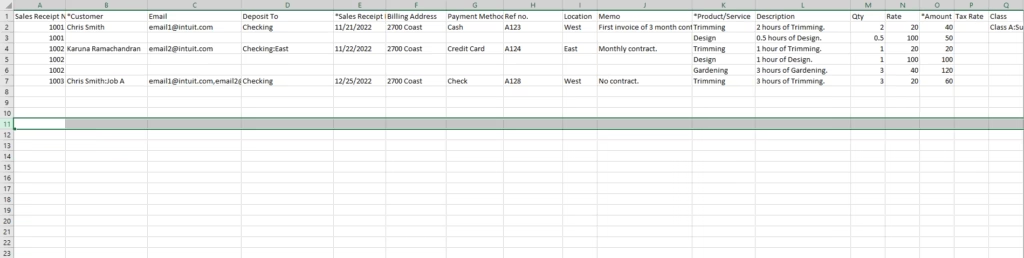
Open your CSV or Excel file and check the columns. At minimum, you usually need customer name, receipt date, product or service, description, quantity, rate or amount, payment method, deposit account, and sales tax details if applicable.
Remove blank rows, merged cells, subtotals, formulas, and notes that are not part of the transaction data. Import tools read structured data best, not spreadsheets designed for human viewing.
Step 3: Decide how line items should be structured
Some import tools require one row per sales receipt. Others require one row per line item, using the same receipt number to group multiple lines together. This is important if a receipt includes several products, discounts, shipping, or tax lines.
Check your import tool’s template before editing your file. The expected result is a file that matches the importer’s required layout instead of forcing QuickBooks to guess.
Step 4: Clean customer names
Customer names in your file should match QuickBooks Online exactly unless your import tool can create new customers during import. For example, “ABC Company” and “ABC Company LLC” may become two separate customers if you are not careful.
Before importing, review your customer list in QuickBooks and correct obvious duplicates. This helps preserve accurate customer sales reports and avoids unnecessary cleanup later.
Step 5: Match products and services
Each sales receipt line should use a product or service item. That item controls how income is categorized and, in some cases, whether the sale is taxable.
If your spreadsheet uses generic names like “Sales” or “Item 1,” decide whether to create matching items or map them to existing QuickBooks products and services. The expected result is that revenue posts to the correct income accounts.
Step 6: Confirm tax treatment
Sales tax is one of the most sensitive parts of importing sales receipts. If your file includes tax amounts, taxable status, tax agency, or tax code, make sure those values align with your QuickBooks Online sales tax setup.
Do not guess on tax codes. If historical tax returns have already been filed, importing receipts with different tax handling can make QuickBooks disagree with your filed returns.
Step 7: Choose the deposit account
Decide whether imported payments should go to Undeposited Funds or directly to a bank account. Undeposited Funds is often better when you need to group multiple receipts into one bank deposit that matches your bank feed.
If each sales receipt already matches a separate bank deposit, posting directly to the bank account may be acceptable. The expected result is that your bank reconciliation remains clean.
Step 8: Select an Import Method
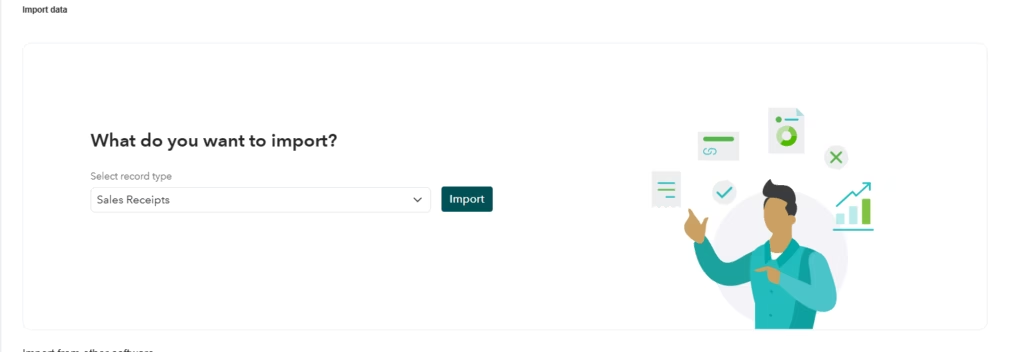
QuickBooks Online includes a built-in Import Sales Receipts feature that allows you to import sales receipts from a CSV file. This is the easiest option if your data matches QuickBooks’ required format and your import requirements are straightforward.
To access the feature:
- Sign in to QuickBooks Online.
- Select the Settings Gear Icon
- Choose Import Data.
- Select Sales Receipts.
- Upload your CSV file.
- Map your CSV columns to the corresponding QuickBooks fields.
- Review the data and complete the import.
If your file contains complex data such as multiple line items, custom fields, historical transactions, or data exported from an eCommerce platform or POS system you may find that a third-party import application offers additional capabilities. Many import tools provide advanced field mapping, duplicate detection, detailed import logs, rollback options, and support for more complex import scenarios.
Before importing a large number of transactions, always perform a test import using a small batch of records. Verify that customer names, products or services, tax codes, payment methods, deposit accounts, and transaction totals have been imported correctly before processing the full file.
Step 9: Map your fields
Field mapping tells the importer which spreadsheet column belongs in each QuickBooks field. For example, your “Sale Date” column may need to map to “Sales Receipt Date,” and your “SKU” column may need to map to “Product/Service.”
Take your time on this screen. A wrong map can put receipt numbers into memo fields, post all sales to one item, or send payments to the wrong account.
Step 10: Run a small test import
Never import the full file first. Import 3 to 5 receipts that include common scenarios, such as taxable sales, non-taxable sales, discounts, and multiple line items.
After the test, open each receipt in QuickBooks and compare it against the source file. The expected result is that customer, date, amount, item, tax, payment method, and deposit account all match.
Step 11: Import the full file
Once the test batch is correct, import the remaining file. Keep the import log or confirmation report. It can help you identify skipped rows, rejected transactions, or warnings.
If your importer supports duplicate detection, turn it on and use a unique receipt number. This reduces the risk of importing the same sales twice.
Step 12: Review reports after import
Run a Sales by Customer Summary, Sales by Product/Service Summary, Profit and Loss, and Sales Tax Liability report for the imported date range. Compare totals to your original file.
If totals do not match, stop before reconciling or filing taxes. Find the difference while the import is still fresh and easier to trace.
Verification Checklist
| Check | How to Verify | Expected Result |
|---|---|---|
| Total sales | Compare Profit and Loss to source file | Income totals match |
| Customer balances | Review customer records | No unpaid balances created by paid sales |
| Sales tax | Run Sales Tax Liability report | Tax agrees with source data and filings |
| Deposits | Review bank register or Undeposited Funds | Payments are in the correct account |
| Products and services | Run Sales by Product/Service Summary | Items and income categories look correct |
| Duplicates | Search receipt numbers | Each receipt appears once |
Common Problems
| Problem | Cause | Solution |
|---|---|---|
| Rows fail to import | Missing required fields or invalid formatting | Review the import log and correct the file |
| Duplicate customers appear | Customer names do not match QuickBooks | Standardize names before importing |
| Sales post to the wrong income account | Incorrect product or service mapping | Fix item setup and re-import or edit receipts |
| Bank reconciliation is off | Payments posted to the wrong deposit account | Use Undeposited Funds when deposits are grouped |
| Sales tax does not match | Wrong tax codes or imported tax amounts | Review tax settings before importing more data |
Common Mistakes
The most common mistake is importing before cleaning the file. QuickBooks will not fix inconsistent customer names, unclear item names, or bad dates for you.
Another mistake is importing sales receipts for transactions that already came through bank feeds or a payment processor sync. That can duplicate income. Always check whether the sales already exist in QuickBooks before importing historical data.
Beginners also overlook deposit accounts. If you send every receipt directly to the bank account, your bank feed may become harder to match, especially when merchant deposits are batched.
Best Practices
- Use unique receipt numbers: This makes duplicate detection and troubleshooting much easier.
- Import customers and items first: Clean lists lead to cleaner transactions.
- Test before bulk importing: A small test batch catches mapping problems early.
- Keep the original file: You may need it for audit support or troubleshooting.
- Compare reports immediately: Waiting weeks makes errors harder to find.
- Separate historical cleanup from live bookkeeping: This helps protect current reconciliations.
Frequently Asked Questions
Can QuickBooks Online import sales receipts directly from CSV?
QuickBooks Online does not generally provide a simple native CSV import option for sales receipts. Most businesses use a third-party import app, integration, API process, or professional import service.
What fields are required to import a sales receipt?
Common required fields include customer, date, product or service, amount, and payment or deposit account. Your import tool may also require receipt number, quantity, rate, tax code, or payment method.
Should I import sales receipts or invoices?
Use sales receipts for paid-at-sale transactions. Use invoices when the customer owes money after the sale. Choosing the wrong type can distort accounts receivable and cash reporting.
Can I import sales receipts with multiple line items?
Yes, if your import tool supports grouped line items. Usually, each line uses the same receipt number so the importer knows the lines belong to one transaction.
Will imported sales receipts affect sales tax reports?
Yes. Sales receipts can affect taxable sales and sales tax liability. Always verify tax codes, tax amounts, and filing periods before relying on the reports.
How do I avoid duplicate income?
Check whether sales already exist from bank feeds, ecommerce connectors, or payment processor syncs. Use unique receipt numbers and import only missing transactions.
Should receipts go to Undeposited Funds?
Use Undeposited Funds when several sales receipts are combined into one bank deposit. This helps match QuickBooks deposits to your bank feed.
Can I undo a sales receipt import?
It depends on the import tool. Some tools offer rollback or batch delete options, while others do not. Confirm this before importing a large file.
Can Databrax import sales receipts for me?
Yes. Databrax can prepare the file, map the data, import the transactions, verify reports, and help clean up issues after the import.
Key Takeaways
- Sales receipts are for paid sales, not unpaid customer invoices.
- QuickBooks Online usually requires a third-party tool or professional process for sales receipt imports.
- Clean customers, products, tax settings, and deposit accounts before importing.
- Always test with a small batch before importing the full file.
- Verify totals, taxes, deposits, and duplicates immediately after import.
Conclusion
Importing sales receipts into QuickBooks Online can save a significant amount of time, but only when the data is prepared correctly. The quality of your spreadsheet, field mapping, tax setup, and deposit handling determines whether the import improves your books or creates cleanup work.
If you are importing a small file, a careful test batch may be enough. If you are moving historical sales, ecommerce data, POS transactions, or tax-sensitive records, it is worth getting the process reviewed before importing everything.
Need Expert Help with QuickBooks?
Databrax can help with QuickBooks data migration, bulk imports, cleanup, error resolution, reporting, and ongoing support. Whether you need sales receipts imported from a spreadsheet, POS system, ecommerce platform, or old accounting file, our QuickBooks specialists can help you get the data in cleanly and verify the results.