
Table of Contents
Introduction
Importing journal entries into QuickBooks Online can save hours when you are moving data from another accounting system, posting month-end adjustments, or entering entries prepared by your accountant.
Journal entries affect your general ledger directly, so they deserve more care than most imports. A small mistake in an account name, debit amount, credit amount, date, customer, vendor, class, or location can create inaccurate financial statements.
This guide explains how to Import Journal Entries into QuickBooks Online, what to prepare first, what can go wrong, and how to verify the results after the import. It is written for business owners, bookkeepers, accountants, freelancers, and ProAdvisors who want a reliable process instead of trial and error.
Important:
Journal entries change your accounting records directly. Before importing, review your file carefully, keep a copy of the original spreadsheet, and consider exporting key reports so you have a reference point if something needs to be corrected.
Quick Answer
You can import journal entries into QuickBooks Online by preparing a clean CSV file, going to the import area in QuickBooks, selecting journal entries if available in your subscription and region, mapping the spreadsheet columns, reviewing the data, and completing the import.
If your QuickBooks Online company does not show a journal entry import option, you may need to use a trusted third-party import tool, QuickBooks Online Accountant tools, Spreadsheet Sync in supported plans, or manually enter the journal entries.
| Item | Quick Answer |
|---|---|
| Best file type | CSV, which means comma-separated values |
| Must debits equal credits? | Yes, each journal entry must balance |
| Can you import entries to Accounts Receivable or Accounts Payable? | Yes, but you must include the correct customer or vendor name |
| Can every QuickBooks Online user import journal entries? | No, permissions and product availability matter |
| Should you test before importing many entries? | Yes, always test with a small batch first |
What is Import Journal Entries into QuickBooks Online?
Import Journal Entries into QuickBooks Online means uploading journal entry data from a spreadsheet into your QuickBooks Online company instead of entering each journal entry one line at a time.
A journal entry is an accounting transaction that records debits and credits. A debit increases some accounts and decreases others, depending on the account type. A credit does the opposite. For example, a payroll accrual may debit wage expense and credit accrued payroll liability.
QuickBooks Online uses journal entries to record adjustments that do not fit normal forms like invoices, bills, checks, deposits, sales receipts, or expenses. Accountants often use journal entries for depreciation, accruals, reclassifications, opening balances, loan adjustments, payroll allocations, and year-end cleanup.
A CSV file is a spreadsheet file where each field is separated by a comma. You can create it from Microsoft Excel, Google Sheets, Numbers, or many accounting systems. QuickBooks reads the CSV and places the information into the correct fields when the columns are mapped properly.
Pro Tip:
Do not use journal entries for everyday customer invoices, vendor bills, payments, or bank activity unless your accountant specifically recommends it. QuickBooks reports work best when you use the proper transaction type.
Why it Matters
Journal entry imports matter because they let you move large volumes of accounting adjustments quickly. This is especially useful during a conversion from another system, cleanup project, month-end close, or tax preparation.
They also reduce manual typing. If you need to enter 200 historical adjusting entries, manual entry can take hours and create avoidable errors. A clean import file can complete the same work much faster.
Accuracy matters even more than speed. Journal entries post directly to your chart of accounts, which is the list of accounts QuickBooks uses to organize your books. Incorrect entries can affect your profit and loss report, balance sheet, tax reports, loan balances, owner equity, and retained earnings.
For accountants and bookkeepers, journal entry imports also improve consistency. You can prepare entries in a standard template, review them before uploading, and keep the spreadsheet as part of your workpapers.
Requirements Before You Begin
Before you import, check whether your QuickBooks Online company supports the method you plan to use. QuickBooks features can vary by subscription level, country, user permissions, and product updates.
You should also confirm that you have the correct access. In QuickBooks Online, users with limited access may not be able to import data or create journal entries. An administrator, company admin, or accountant user usually has the needed permission.
| Requirement | Why It Matters |
|---|---|
| Admin or accountant access | You need permission to create accounting transactions and import data |
| Clean chart of accounts | Imported entries must post to valid accounts |
| Balanced journal entries | Total debits must equal total credits for each entry |
| Correct date format | Wrong dates can post entries to the wrong accounting period |
| Existing names | Customers, vendors, employees, classes, and locations should already exist when used |
| Open accounting period | Closed books may block changes or require a closing date password |
Important:
If your books are closed for a prior period, do not import entries into that period without approval from the business owner, accountant, or tax preparer. Changing closed periods can alter filed tax returns and financial reports.
QuickBooks Online and QuickBooks Desktop handle imports differently. QuickBooks Desktop can use IIF files, which stands for Intuit Interchange Format, and some Accountant tools can import or send general journal entries. QuickBooks Online generally relies on CSV import options, accountant features, Spreadsheet Sync in supported plans, apps, or manual entry.
If you are also moving lists such as customers, vendors, or chart of accounts, import those first. Databrax has related guides on how to import customers into QuickBooks, import vendors, and import chart of accounts if you need to prepare supporting data before journal entries.
Things to Prepare
The best journal entry import starts in the spreadsheet. QuickBooks can only import what you give it, so the file should be clean, consistent, and easy to review.
Your spreadsheet should usually include columns for journal date, journal number, account, debit, credit, description, name, class, and location. Not every field is required, but clear columns make mapping easier.
| Column | What It Means | Example |
|---|---|---|
| Journal date | The posting date of the entry | 12/31/2025 |
| Journal number | The reference number that groups lines into one entry | YE-001 |
| Account | The general ledger account receiving the debit or credit | Depreciation Expense |
| Debit | Amount entered on the debit side | 500.00 |
| Credit | Amount entered on the credit side | 500.00 |
| Description | Memo explaining the reason for the line | Monthly depreciation |
| Name | Customer, vendor, employee, or other name connected to the line | ABC Supplies |
| Class or location | Tracking fields used for departments, branches, or divisions | Retail Division |
Here is a simple example. Suppose your accountant wants to record monthly depreciation on equipment. The entry may debit Depreciation Expense for 500.00 and credit Accumulated Depreciation for 500.00. The total debits and credits match, so the entry balances.
Pro Tip:
Use a separate journal number for each entry. If multiple lines share the same journal number and date, QuickBooks or your import tool can usually group them into one journal entry.
Before saving the file as CSV, remove formulas, merged cells, blank rows, subtotals, hidden columns, and special formatting. Keep one header row at the top. Use numbers only in debit and credit columns, without currency symbols.
If your entry uses Accounts Receivable, also called A/R, include a customer name. If it uses Accounts Payable, also called A/P, include a vendor name. QuickBooks needs that name to keep customer and vendor balances accurate.
Step-by-Step Guide
Method 1: Import journal entries using the QuickBooks Online import area
This is the preferred method when your QuickBooks Online company shows a journal entry import option. The exact screen names may change slightly as QuickBooks updates its interface, but the workflow is usually similar.
- Sign in to QuickBooks Online. Use an admin or accountant user. This matters because journal entries affect the general ledger and may not be available to standard users. The expected result is that you can access company settings and accounting tools.
- Open the Settings menu. Select the gear icon near the top right of the screen. This is where QuickBooks keeps import tools, lists, and company settings.
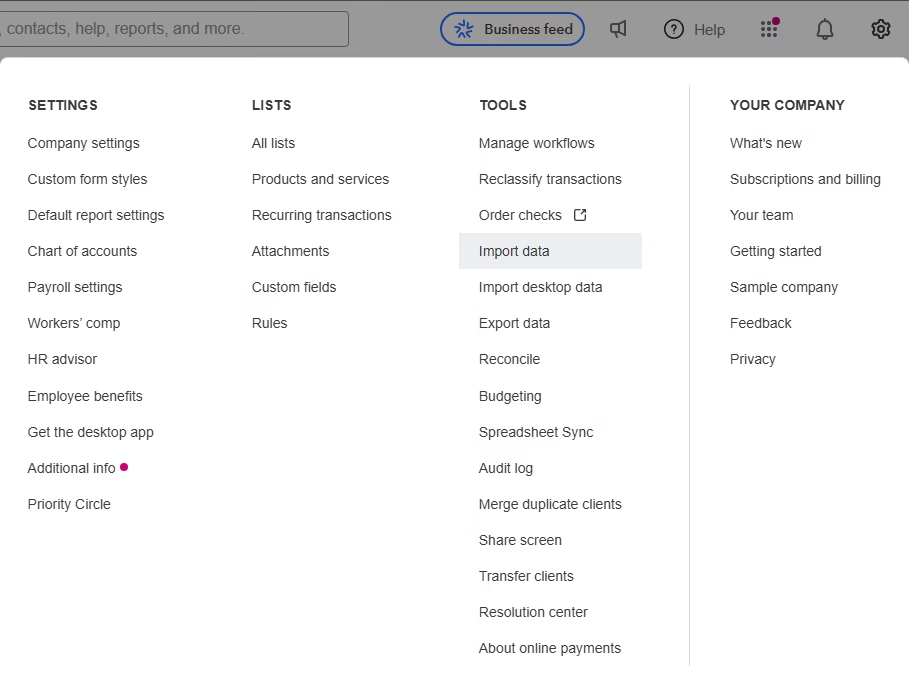
- Choose Import data. Look for the import option under tools. If journal entries appear as an import type, select it. If you do not see it, your company may not support native journal entry import.
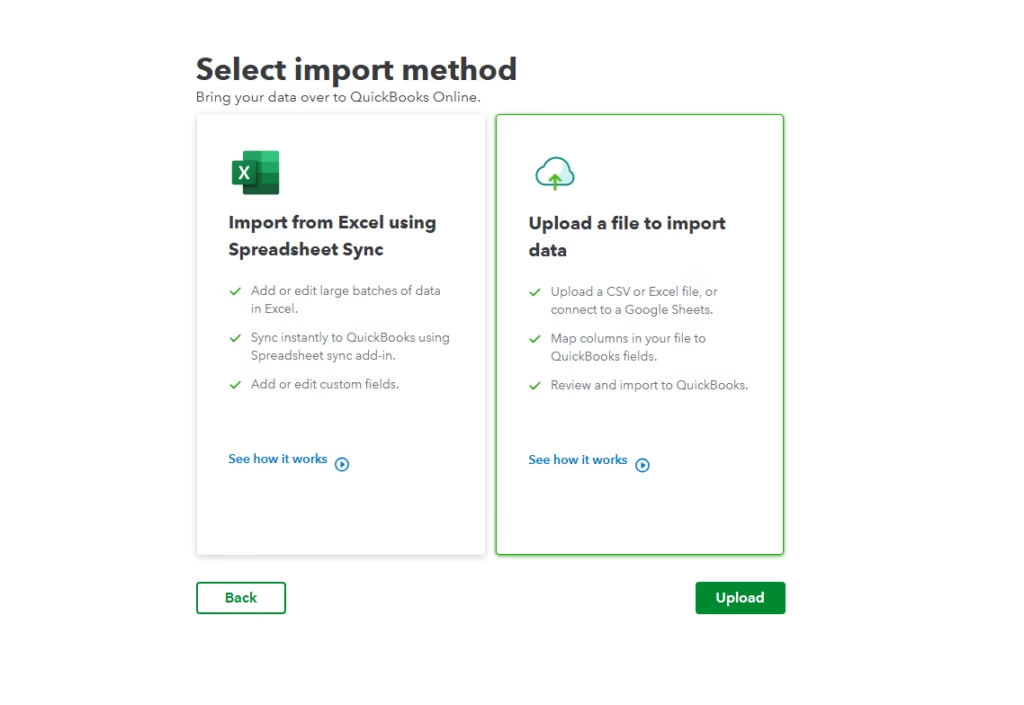
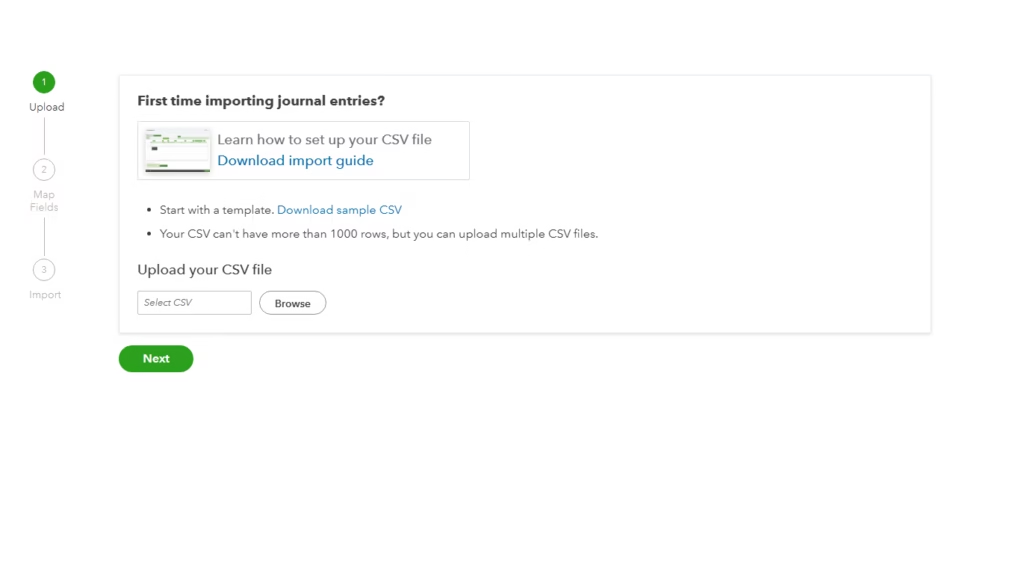
- Download the sample file if offered. The sample file shows the column structure QuickBooks expects. This step helps you avoid mapping problems and missing required fields.
- Prepare your CSV file. Match your spreadsheet columns to the fields QuickBooks expects. Check account names, dates, debit amounts, credit amounts, names, classes, and locations.
- Upload the CSV file. Select your file and continue. QuickBooks will read the file and move you to the mapping screen.
Screenshot Placeholder: Import mapping
- Map each column. Mapping means telling QuickBooks which spreadsheet column belongs to which QuickBooks field. For example, map your Account column to the QuickBooks Account field and your Debit column to the Debit field.
- Review the import preview. Look for blank accounts, wrong dates, unmatched names, negative amounts, or entries that do not balance. Fix your spreadsheet before importing if anything looks wrong.
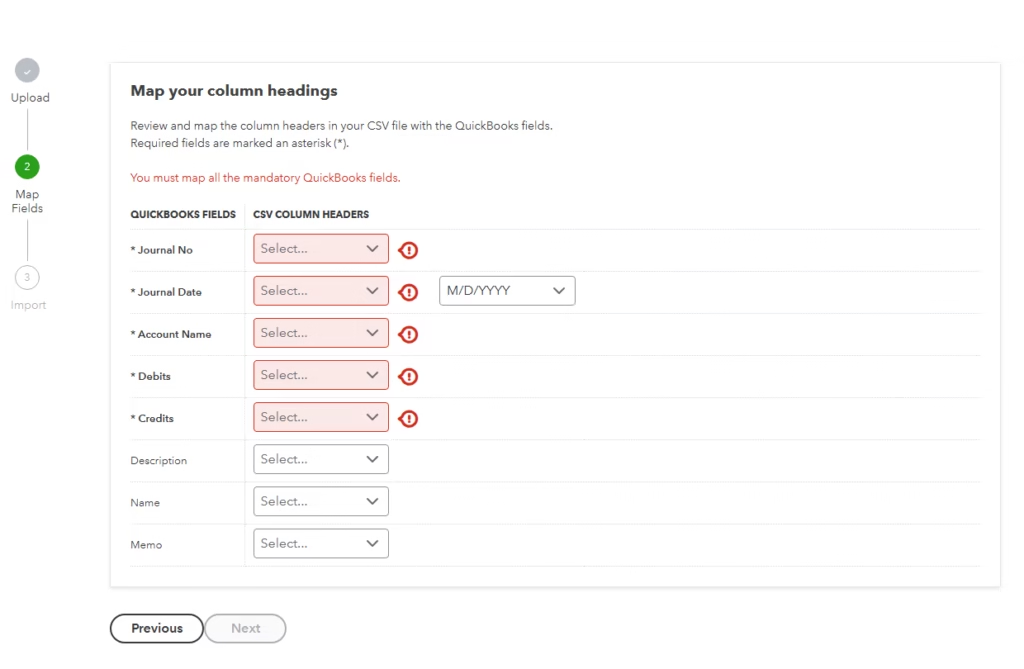
- Complete the import. Confirm only after reviewing the preview. The expected result is that QuickBooks creates journal entries from the uploaded lines.
Important:
Do not import the same file twice unless you intend to duplicate the journal entries. QuickBooks may not always stop duplicate imports automatically.
Method 2: Use a third-party import tool when native import is unavailable
Some QuickBooks Online companies do not show journal entries in the built-in import area. In that case, many firms use a reputable third-party importer or a migration service.
- Choose a trusted app or service. Review supported fields, security practices, user reviews, and whether the tool can import journal entries with classes, locations, names, and multi-line entries.
- Connect the app to QuickBooks Online. Use an admin login and grant only the permissions required. The expected result is that the app can read lists and create journal entries.
- Upload your spreadsheet. Use the app template when available. Good tools usually provide clearer error reports than a basic import screen.
- Map and validate the data. Confirm accounts, names, dates, debits, and credits. Validation helps catch problems before the entries post.
- Import a small test batch first. Try one or two entries before importing hundreds. Review the results in QuickBooks before continuing.
Pro Tip:
For large migrations, import journal entries in monthly or quarterly batches. Smaller batches are easier to review, easier to troubleshoot, and easier to reverse if needed.
Method 3: Manually enter journal entries for small batches
If you only have one or two entries, manual entry may be safer than importing. Go to the New button, choose Journal Entry, enter the date, accounts, debits, credits, names, classes, and memo, then save.
Manual entry gives you more control and lets you see QuickBooks warnings immediately. It is slower, but it works well for small adjustments or entries that need careful review.
QuickBooks Online vs QuickBooks Desktop
| Feature | QuickBooks Online | QuickBooks Desktop |
|---|---|---|
| Common import file | CSV or app-based import | IIF file, Accountant tools, or third-party tools |
| Access | Browser-based, permission controlled | Company file access and user permissions |
| Backup options | No simple local company backup in most plans; export reports before import | Create a full company backup before importing |
| Risk level | Data can be difficult to undo in bulk | IIF imports can be risky if not validated |
| Best use | Cloud accounting, app integrations, accountant workflow | Local file control and traditional accountant workflows |
Important:
In QuickBooks Desktop, always create a full backup before importing IIF files or large journal entry batches. Desktop imports can affect many accounts at once, and a backup is the safest rollback option.
Verification Checklist
After the import, verify the entries before you move on. Do not assume the import worked perfectly just because QuickBooks displayed a success message.
| Check | How to Verify | What You Want to See |
|---|---|---|
| Journal entry list | Open recent transactions or search by journal number | All imported entries appear once |
| Trial Balance | Run a Trial Balance report for the import period | Total debits equal total credits |
| Profit and Loss | Run the report for affected dates | Income and expense changes match your spreadsheet |
| Balance Sheet | Review assets, liabilities, and equity | Account balances agree with expected totals |
| A/R and A/P aging | Run aging reports if entries touched receivables or payables | Customer and vendor balances look correct |
| Classes and locations | Run class or location reports | Amounts appear under the right tracking category |

Save your import file, QuickBooks confirmation, and key reports in a month-end or migration folder. These records make future audits, reviews, and cleanup much easier.
Common Problems
Most journal entry import problems come from formatting, missing list items, unbalanced entries, or permission limits. The table below covers the issues I see most often during cleanup and migration projects.
| Problem | Likely Cause | Fix |
|---|---|---|
| Journal entries do not balance | Total debits and credits differ for one journal number | Use a pivot table or SUMIF formula to check each journal number before import |
| Account not found | Spreadsheet account name does not match QuickBooks | Create the account first or update the spreadsheet to match exactly |
| Wrong posting date | Date format changed during CSV save | Use a consistent date format and review the preview screen carefully |
| A/R or A/P error | Customer or vendor name missing | Add the correct name to each receivable or payable line |
| Duplicate entries | Same file imported more than once | Search by journal number and delete or reverse duplicates carefully |
| Class or location missing | Tracking feature disabled or values not created | Enable tracking and create classes or locations before importing |
| Import option not visible | Feature unavailable or user lacks access | Check permissions, subscription, region, accountant tools, or use a trusted app |
Important:
If you find a mistake after import, do not start deleting entries randomly. First identify the exact affected entries, export a report, and decide whether to delete, edit, or reverse them with your accountant.
Common Mistakes
The most common mistake is importing without reviewing the CSV file. A spreadsheet can look fine on screen but still contain hidden formulas, blank lines, text in amount fields, or dates that changed during export.
Another mistake is using journal entries to force balances. If a bank balance, customer balance, or vendor balance is wrong, find the source transaction first. A journal entry may hide the problem instead of fixing it.
Many users also forget the name field for Accounts Receivable and Accounts Payable lines. QuickBooks needs a customer for A/R and a vendor for A/P. Without that detail, aging reports and open balances can become unreliable.
Importing into the wrong period is another serious issue. A date typo like 01/12 instead of 12/01 can move an adjustment into the wrong month, especially when files move between date formats used in different countries.
One more mistake is skipping duplicate checks. If you import the same entries twice, your income, expenses, assets, liabilities, and equity may all be overstated or understated.
Best Practices
Use a standard template for every journal entry import. Keep the same column names and order each time. This reduces mapping errors and helps your team review files faster.
Import supporting lists first. If your journal entries use new accounts, customers, vendors, classes, or locations, create those before importing the entries. For help with related list imports, review Databrax guides on importing customers, vendors, and chart of accounts into QuickBooks.
Use clear journal numbers. For example, use JE-2025-001, JE-2025-002, or PAYROLL-2025-01. Clear references make entries easier to find later.
Keep descriptions meaningful. A memo like reclass office rent to admin is more useful than adjustment. Good descriptions save time during reviews and audits.
Separate large imports by purpose. Do not mix opening balances, payroll accruals, depreciation, tax adjustments, and cleanup entries in one giant file. Separate files help you troubleshoot and document the work.
Run reports before and after the import. At minimum, export the Trial Balance, Profit and Loss, Balance Sheet, A/R Aging, and A/P Aging for the affected period. These reports give you a before-and-after comparison.
Frequently Asked Questions
Can I Import Journal Entries into QuickBooks Online from Excel?
Yes, but you usually need to save the Excel file as a CSV file first. CSV is a plain spreadsheet format that QuickBooks and import tools can read more reliably.
Why do I not see journal entries under Import data in QuickBooks Online?
The option may not be available in your subscription, region, or user role. Check your permissions, ask the company admin, or consider an accountant tool or trusted third-party importer.
Do journal entries need to balance before import?
Yes. For each journal entry, total debits must equal total credits. QuickBooks should reject unbalanced entries, but you should catch the issue in your spreadsheet first.
Can I import journal entries with classes and locations?
Often yes, if classes and locations are enabled and the values already exist in QuickBooks. The exact support depends on the import method you use.
Can I import journal entries to Accounts Receivable?
Yes, but every A/R line should include a customer name. Without the customer, your receivable reports may not show balances correctly.
Can I import journal entries to Accounts Payable?
Yes, but every A/P line should include a vendor name. This keeps vendor balances and aging reports accurate.
Can I undo a journal entry import in QuickBooks Online?
QuickBooks Online does not always provide a simple bulk undo for journal entry imports. You may need to delete, edit, or reverse entries individually or use an app if it supports rollback.
Should I import opening balances as journal entries?
Opening balances can be imported as journal entries during a conversion, but they must be planned carefully. Use a clear conversion date and confirm the balances with your accountant.
Can I import recurring journal entries?
Imported journal entries usually come in as posted transactions, not recurring templates. If you need recurring entries, set them up separately in QuickBooks if your plan supports recurring transactions.
Is QuickBooks Desktop journal entry import the same as QuickBooks Online?
No. QuickBooks Desktop commonly uses IIF files or Accountant tools, while QuickBooks Online uses CSV-based imports, apps, or accountant-connected workflows depending on availability.
Key Takeaways
- Importing journal entries can save time, especially during migrations, cleanup, and month-end close.
- Each journal entry must balance, with total debits equal to total credits.
- Use a clean CSV file with consistent dates, account names, debit amounts, credit amounts, and descriptions.
- Import customers, vendors, accounts, classes, and locations before using them in journal entries.
- Use customer names on Accounts Receivable lines and vendor names on Accounts Payable lines.
- Always review the import preview before posting entries.
- Run reports before and after the import to confirm the results.
- If native import is unavailable, use a trusted third-party tool or professional migration service.
- Do not import into closed periods without accountant approval.
Conclusion
When you Import Journal Entries into QuickBooks Online correctly, you can save time and keep your accounting records organized. The key is preparation. Clean your spreadsheet, confirm your accounts and names, check that every entry balances, and review the results after import.
Journal entries are powerful because they affect your books directly. Treat them with the same care you would give a tax adjustment, loan entry, or year-end closing entry. A few extra minutes of review before import can prevent hours of cleanup later.
If you are only entering one simple adjustment, manual entry may be enough. If you are importing dozens or hundreds of entries, use a controlled process, test with a small batch, and keep clear documentation.
Need Expert Help with QuickBooks?
Databrax helps businesses, bookkeepers, and accountants handle QuickBooks work that needs accuracy and experience. We assist with data migration, bulk imports, data cleanup, error resolution, reporting, and QuickBooks support.
If you need to import journal entries, move historical accounting data, clean up duplicate transactions, or fix posting errors, our team can help you complete the work safely and efficiently.